This article covers the tail lights assemblies, which includes the parking or marker lights, brake lights, rear turn lights and backup lights, as well as high-center stop lights.
Taillight Assemblies[]
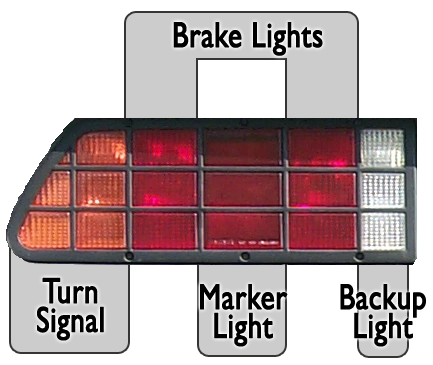
Taillight identification diagram, driver's side.
The DeLorean has two taillight assemblies, one on each side of the car. These contain the brake lights, turn signals, reverse lights and parking or marker lights:
- Brake lights are the two red lights on each side that flank the the central red marker light, and are illuminated when your press the brake pedal. On some early cars, you must turn the key in the ignition for these to work.
- Parking lights, or marker lights, are the central red light, and are lit when the headlight switch is in either "on" position, even if the car itself is off.
- Turn signals are on the outer end, and light amber when the car is on and the turn signal switch is flipped to the appropriate direction.
- Backup lights are behind the clear lenses closest to the license plate, and help illuminate the road behind when backing up, as well as alerting other drivers and pedestrians that you are in reverse. They automatically come on when the car is on and in reverse gear.
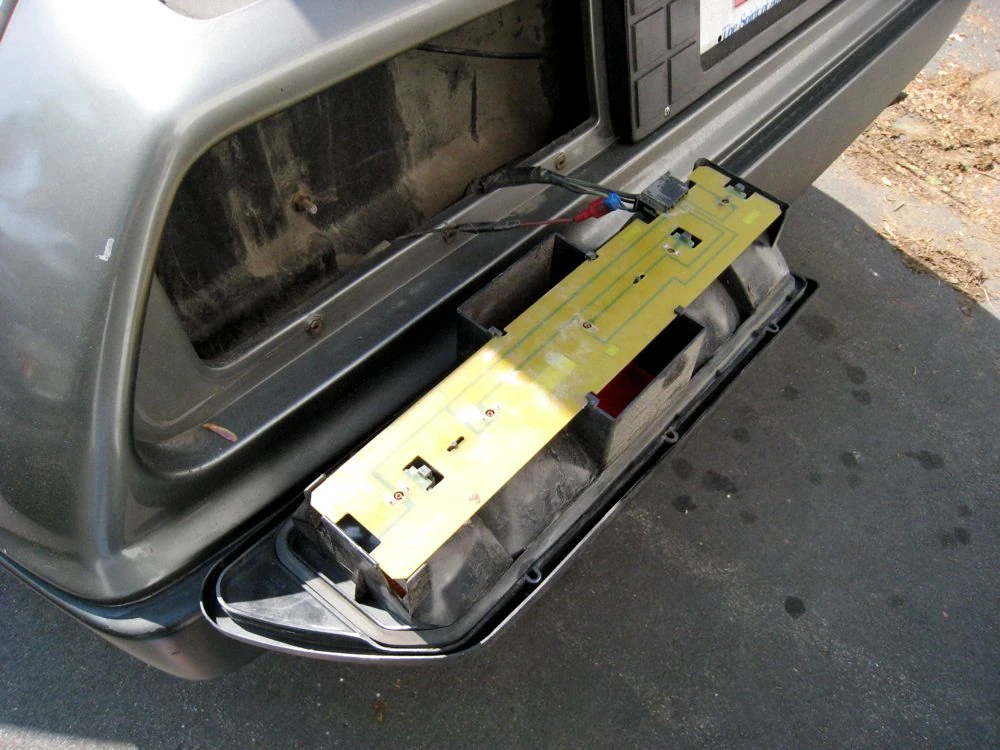
The assemblies themselves are held onto the rear fascia by six screws each. Once the screws are removed, the assembly can be tilted out and the electrical connector can be detached from the taillight board, allowing the entire assembly to be removed from the car.
High-Center Stop Light[]
Also called a third brake light, the HCSL is mandatory on all modern cars. Although the DeLorean predates this requirement, the car is so low that many owners have added their own center brake light to improve their visibility and safety.
ssdelorean has posted extremely detailed instructions on DMCTalk for how to install a third brake light on a DeLorean. He covers a few different styles of brake light, with complete details on mounting and wiring with numerous pictures. The process is not very complicated, but may require modifying the louvers to mount the light.
Bulbs[]
Incandescent[]
The part numbers for the stock incandescent bulbs are labeled on the tail light circuit board. Replacement bulbs are available from DeLorean vendors and many auto-parts stores. Each tail light assembly uses five bulbs, for a total of ten. These are single-filament, single-contact bayonet-style boulb, model number 1156[1]. It is not uncommon to use 5 watt bulbs for all of the rear lights, but some owners have used 10 watt bulbs in their brake lights to increase visibility. The DeLorean Owners Manual recommends 5 watt bulbs for the tail lights and 21 watt bulbs for the brake lights, rear turn lights and backup lights[2].
| Location | Quantity | Model | Minimum Wattage | Recommended Wattage[2] |
|---|---|---|---|---|
Tail (Parking/Marker) Lights
|
2 | 89 or 5008[3][4] | 5 | 5 |
Brake Lights
|
4 | 1156 | 5 | 21 |
Rear Turn Lights
|
2 | 1156 | 5 | 21 |
Back-Up Lights
|
2 | 1156 | 5 | 21 |
Note that the original specification for the center bulb (marker light) was to use a 1156. This is a very hot bulb, and its use would often melt the socket and marker light reflector. Type 89 or 5008 bulbs are now recommended for this light.
LED[]
LED turn signals have their own article, which includes information about which LEDs to use and ensuring they blink at the proper rate.
Maintenance[]
Replacing Bulbs, Step 2
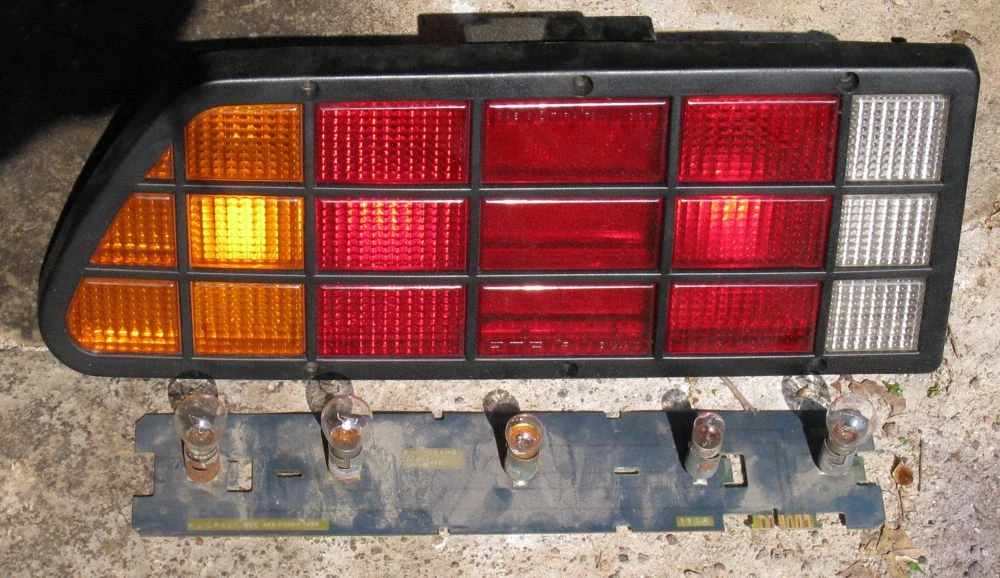
Taillight and Circuit Board
Replacing the Taillight Bulbs[]
- Remove the six screws that hold the taillight assembly onto the car.
- Pull the taillight assembly forward, but not all the way out, as it is still connected to the car's wiring.
- Disconnect the cable from the circuit board on the taillight assembly by squeezing the sides of the connector. While not necessary, this will make things easier, as you can now remove the entire assembly from the car.
- Push back the retaining clip at the edge of the board and slide the circuit board lengthwise along the lens assembly and past the clip to detach it.
- Pull the circuit board away from the lens assembly to access the individual bulbs.
- Push the bulb slightly towards the board and twist it counter-clockwise to release it. The type of bulb is printed next to each socket on the board, and should be 1156 (the outer four bulbs) or 89 (the center bulb).
- Insert a new bulb and reverse the procedure to re-assemble the taillights.
You may want to clean the entire circuit board while you have it out of the car, including the connector contacts and the bulb sockets. Corrosion on the board can cause dim lights due to increased resistance, and it may act as an insulator resulting in in an intermittent or constant "fast blinker" effect.
Restoring the Taillight Lens Tint[]
Funkmasterbrad on the DMCTalk forum has successfully used VANS Tail Light Spray to re-tint his faded amber tail lights, which had become completely clear after sitting in the desert sun for 25 years. He was able to simply remove the tail light assembly and spray the tint directly into the holes that the bulbs fit into.[5]
Cleaning the Circuit Board[]
Originally posted by David Teitelbaum on the DMCNews Yahoo Group:
"Go to a plumbing supply and get some of the little brushes they use to clean the insides of copper fittings before soldering them. After cleaning up the taillight boards as good as you can either solder the rivets to the traces or get some tiny screws and nuts to tighten up the rivets for better contact. Test the reverse switch with a meter."
Modifications[]
Marker Light Reflector[]
John on DMCNews has made use of a 3.5" CD to serve as a reflector for the marker light at the center of the taillight assembly.
Wiring Brake Lights as Marker Lights[]
Normally, only the marker light in the center of the taillight assembly is lit when the lights are on. Bill Robertson posted instructions on DMCNews for how to make the center brake lights act as a marker lights. The process involves replacing the two single-filament brake light sockets with dual filament ones, wiring the second lead up to the marker light socket. Once type 1157 bulbs are placed in the sockets, one filament will burn when the marker lights are active, while both filaments will illuminate when the brake pedal are pressed.
Troubleshooting[]
Testing the Taillights[]
To check the lights you will need an assistant or some clever way of viewing the lights (video camera/monitor, mirror, etc). Note that some early DeLoreans require the car to be in the "Ignition II" stage before the brake lights will come on, but this is not necessary on later cars.
- Engage the emergency brake.
- Turn the key in the ignition to "Ignition II" ("Run"). There is no need to start the car..
- From the off position, push the headlight switch once to turn on the parking lights.
- Check the two red lights flanking the center brake light on each taillight assembly for illumination.
- Depress the brake pedal.
- Check the center red light on of each taillight assembly for illumination.
- Turn on the left turn signal
- Check the leftmost amber light in the left taillight assembly for illumination. Should blink about twice per second.
- Turn on the right turn signal
- Check the rightmost amber light in the right taillight assembly for illumination. Should blink about twice per second.
- With your foot on the brake, shift the car into reverse. Remember that the car will roll if the brake is not engaged.
- Check the clear light of each taillight assembly for illumination.
- Turn on the Hazard Switch to test both turn signals and the hazard circuit
- Check the amber lights in each of the the taillight assemblies for illumination. Should blink about twice per second.
If an entire taillight assembly fails to light, check the appropriate fuse, as described below. If a single bulb doesn't light, remove the taillight assembly and see if the bulb needs to be replaced. If a bulb still doesn't light, see the sections below for specific issues. If a turn signal blinks too fast, see "Fast Blinker" below.
Bulbs Won't Illuminate[]
No illumination can be caused by a bad fuse, a bad bulb or a bad electrical connection. The following suggestions are listed from easiest to hardest:
- Check fuse 8 for the right hand taillight (parking light). If blown, replace with a standard 10 amp fuse.
- Check fuse 2 for the left hand taillight (parking light). If blown, replace with a standard 10 amp fuse.
- Check fuse 4 for the turn signals. If blown, replace with a standard 20 amp fuse.
- Check fuse 6 for the brake lights. If blown, replace with a standard 20 amp fuse.
- Check fuse 16 for the back-up lights. If blown, replace with a standard 10 amp fuse.
- Remove the taillight assemblies and check the bulbs themselves, as described above. Replace any blown bulbs using the chart above.
- Check the taillight circuit board connector for 12v or ground on each pin.
- Clean any corrosion from the circuit board connector and the bulb sockets.
- Check for stuck center terminals in the sockets (see Bulbs Illuminate Intermittently below)
- Check any wiring and switches as described below
Bulbs Illuminate Intermittently[]
Intermittent illumination is usually due to a bad electrical connection, including any of the issues described above. These can often be hard to track down due to their inconsistent nature. Other causes of intermittent failure may include the following:
- Loose fuse. Check the fuse sockets and see if wiggling the fuse causes the light to work. If it does, the fuse socket may need to be replaced or bypassed with an inline fuse.
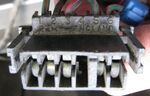
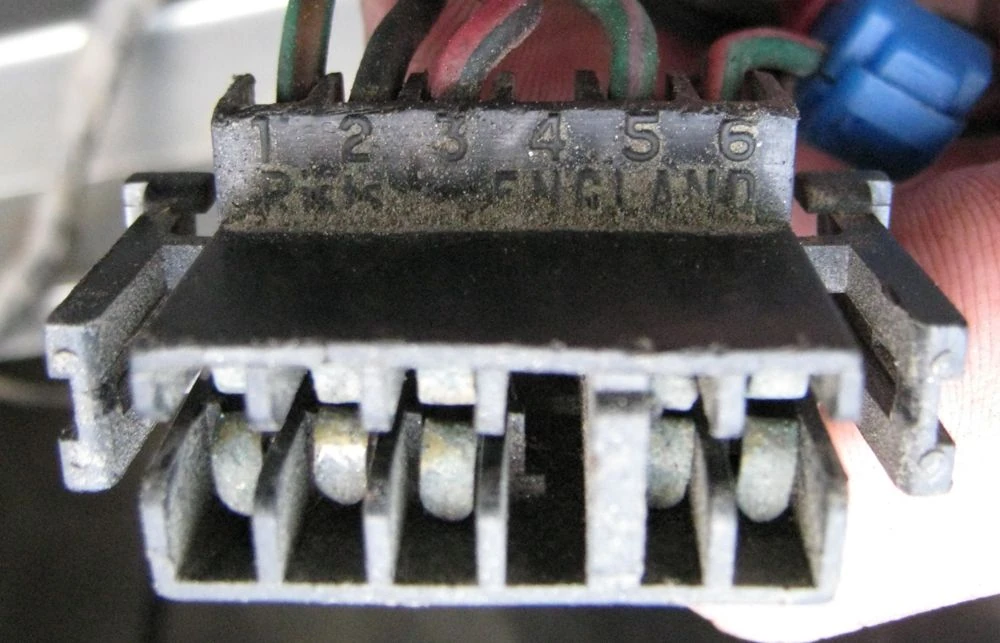
Taillight connector, which plugs into the taillight circuit board.
- Loose taillight board connection. The connector at the taillight board may not be as tight as it could be, possibly due to the spring-like pins becoming flexed over time. Bending the pins back in a little with a small jewelers screwdriver should improve the connection. This is most easily done by pushing down on the outer edge of the pin, causing it to bend inward.
- Rusted socket causing the center spring terminal to stick. Thes spring-loaded terminal at the center of each socket should move freely and easily in order to make solid contact with the base of the bulb. If it has rusted solid so that it cannot move, it may not consistently contact the base of the bulb, causing it to light intermittently. After removing the board from the car, a solvent like WD-40 can be used to loosen the rusted terminal. Laying the board on a piece of wood and tapping the center terminal with a hammer and nail can help break it free of the rust. The terminal should slide easily up and down. If it does not, spray it down with solvent while pushing the terminal with a nail until it slides freely and springs up smoothly and to its full height. Let the board dry completely before screwing the bulb in and remounting the taillight assembly into the car.
Fast Blinker[]
The blinker timer works due to the resistance caused by the bulbs in the circuit. When a bulb burns out, the resistance changes, and the remaining blinkers flash faster. If you start seeing fast-flashing turn signals, first check to make sure all of your bulbs are working properly, and replace any blown ones. Also check the intermittent illumination guide above for possible solutions to a fast blinker that only appears occasionally.
A loose connection to the tail light circuit board can cause some or all of the lights on that board to stop working, which can also cause the "flast blinker" situation. Remove the tail light board as described above in Replacing the Taillight Bulbs and check the quality of the connection to the circuit board. You may also be able to improve the electrical connection between the circuit board and the connector by carefully bending the flexible pins in the connector so they push more firmly against the board.
Similarly, a missing ground could result in a fast blinker[6]. In this situation, the bulb is ok but does not blink. Check the grounds going to the taillight assembly.
You may want to clean all of the contacts on the taillight circuit board, including the bulb sockets, as corrosion be contributing to bulb intensity and blink rate issues[7]. Make sure that the center spring-loaded terminal in the socket easily moves up and down. If one of the terminals is stuck due to rust or some other issue, it may not be making a proper electrical connection with the base of the bulb.
Note that many LEDs do not draw the same amount of current as the original incandescent bulbs. This will affect the timing circuit, which in turn will cause the turn signals to blink faster. See the article on LEDs for information on LED-compatible flasher modules.
Reverse Lights Won't Illuminate[]
If the reverse lights don't function but the taillight assemblies, bulbs and wiring appear to be good, there may be a problem with the reverse switch. This can be identified by a two wire plug going into the side of the transmission. You can test the reverse lights by putting the car into the "Ignition II" position (but do not turn on the car), disconnecting the wires from the switch and shorting them together. If the lights come on, the switch is likely bad. New switches are available from most DeLorean vendors.
Rich A. has a tip on checking the wires from the reverse switch for faults that he posted to the DMCNews Yahoo Group.
External Links[]
- How-To: Install a 3rd Brake Light, posted by ssdelorean on DMCTalk
- 3.5" Re: Miniature Lamps vs Led's Added Reflectors, posted by John on DMCNews about using a 3.5" CD as a marker light reflector.
- Re: Tail Light Bulb Number (Modified Boards), posted by Bill Robertson on DMCNews about modifying the brake lights to work as marker lights.
See Also[]
References[]
- ↑ Tail/Brake light question, please help~ on DMCTalk
- ↑ 2.0 2.1 DeLorean Owners Manual, page 43
- ↑ Re: [DML Re: Tail Light Bulb Number], posted by Jake Kamphoefner on DMCNews
- ↑ RE: [DML Tail Light Bulb Number], posted by Rob Grady on DMCNews
- ↑ Need to re-tint your amber turn signals? by Funkmasterbrad on DMCTalk
- ↑ Lights by welmoedj on DMCNews
- ↑ Re: Parking Lights (fast blinker) by John Podlewski on DMCNews